使用 TS-Check 针对 React/Redux 项目的渐进式静态检查指南
最近正在尝试在自己参与的 JavaScript 前端项目中引入静态类型检查。
至于引入的原因,很明显,源自 JavaScript 是一门【弱类型-动态类型】语言。这使得每次调用已写好的组件或者给已写好的组件打补丁时,都需要重新阅读相关组件的源代码、了解相关变量的类型,以确定可以在这些变量上调用哪些方法,然后再开始 Debug。肉眼检查代码很难完全发现和消除代码中的类型错误,这使得项目中频频出现 Cannot read property 'x' of undefined 或 xxx.map is not a function 等问题。这些 Uncaught Error 轻则使得某些功能无法使用,重则引起 React 引擎中断渲染,导致界面白屏(通常称为阻断性 bug)。此类 bug 往往需要很多时间进行排查,尤其是组件中存在异步事件时,bug 的修复将变得更加棘手。
更糟糕的是,当项目引入 Redux 进行状态管理时,在不使用 Redux Toolkit 的情况下,不论是 Selector、Reducer ,还是 Dispatch、Action ,它们的信息都分布在项目的其他目录里的若干文件中,几乎无法通过阅读代码确定类型,只能通过 console.log 进行调试。
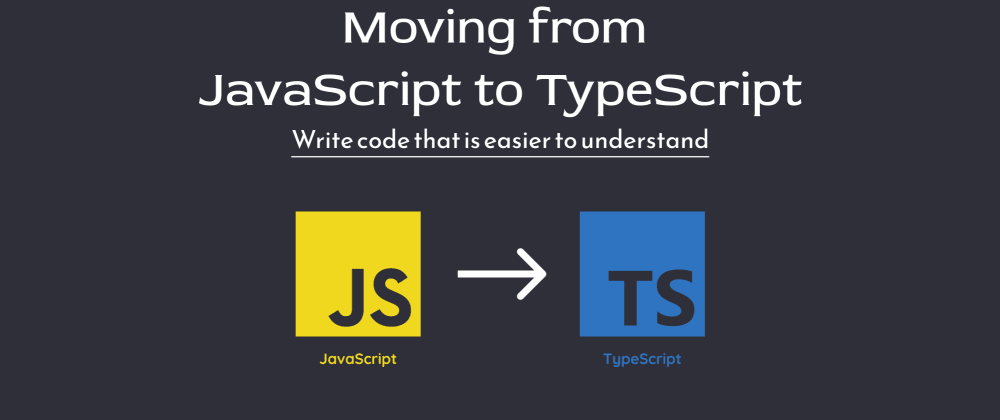
因此,每次调用组件或者 debug 时都感觉:“要是 JavaScript 是强类型的,或者项目使用 TypeScript 进行构建就好了” 。但是将拥有成百上千个文件的中大型项目迁移至 TypeScript 谈何容易?在此语境下,渐进式引入静态类型检查,乃至增量地迁移至 TypeScript 是解决这个场景下问题的方法。
为 React 组件引入类型声明
引入 d.ts
d.ts 文件是 TypeScript 的类型声明文件。与 C/C++ 中类的声明与实现分离类似,我们可以为任意 js 文件创建一个同名的 d.ts 文件,然后在 d.ts 中声明这个 js 中有哪些组件及其类型。在使用 JavaScript 编写的 React 项目中,编译阶段 webpack 的编译器会完全忽略 d.ts 文件(貌似),因此引入 d.ts 文件不会对现有项目的运行造成任何影响。
虽然编译器会忽略 d.ts 文件,但是 VSCode 和 WebStorm 自带的 TypeScript 静态检查器可以根据 d.ts 指出潜在的类型错误,帮助我们发现 bug ,保证类型安全,从而提升代码质量。以下内容对前端常用开发工具 VSCode 和 WebStorm 均有效。
假设你写的应用中有某一个登录组件,它大概长这样:
1 | // App.jsx |
为了实践本文所述内容,我们强烈建议您拷贝上述代码至本地,按照上述内容组织好文件布局,然后继续。
很明显,这样的组件是类型不安全的,实际上此处给出的代码存在类型问题,将会导致 bug ,乃至中断渲染 (想一想为什么)。这些 bug 往往很难排查。
创建类型声明
这两个组件对应的 d.ts 分别是:
1 | // App.d.ts |
如果你不会写 TypeScript 这里介绍几个 TypeScript 的概念:
-
类型系统:TypeScript 允许我们为所有变量声明类型,语法为
const/let/var <变量名>: <类型>。变量名写作<变量名>?时表示它的类型为<类型> | undefine。 -
interface与type:TypeScript 中的interface与一般编程语言的interface很不一样,它可以用于定义变量的类型。type是 TypeScript 中更接近interface本质的东西,定义好的interface和type在使用上差别不大,大部分场景中type与interface可以混用,通常认为应该主要使用其中一种。如果你有选择困难症,可以遵循以下规则:能用interface时就用interface,interface实现不了你的需求时就用type。上述LoginProps用type可以定义为:1
2
3
4
5
6
7export type LoginProps = {
user?: {
username: string;
password: string;
};
permission: "tier1" | "tier2";
} -
联合类型(Union Type):注意
LoginProps的permission类型为"tier1" | "tier2",这表示permission可以从"tier1"和"tier2"中任取一种类型。TypeScript 认为任何特定字符串都是一个类型,他们都是类型string的子集。const permissionTier1: "tier1";表明permissionTier1的类型为"tier1",其值只能是"tier1"。
连接声明与实现
编写 JSDoc
以 Login.jsx 为例,可以将代码修改为:
1 | // @ts-check |
这种形式的注释被称为 JSDoc ,编辑器自带的 TypeScript 静态检查器可以通过 JSDoc 实现类型检查。这时候如果你在编辑器中将鼠标悬浮在 user 上方可以清晰地看见它的类型:
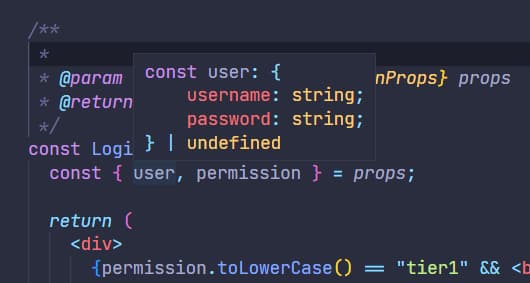
同时注意到代码的最开始我们添加了一行 // @ts-check 这在告诉 TS 静态检查器我们需要为这个文件启用静态检查。添加完成后代码中对 user 的引用会出现红色警告,表明这里存在类型错误。此处的错误是,因为 user 可能为 undefined ,对 undefined 引用 username 属性将引发渲染中断造成白屏,TS 静态检查器发现了这一潜在错误,我们需要为 user 变量的引用可选链运算符 ? 使得当 user 为 undefined 时直接返回 undefined ,避免错误。
如果你希望 TS 静态检查器忽略某一行,可以在前一行写上 // @ts-ignore .
提示:如果你创建 d.ts 文件后发现对应 js 文件并没有识别出 d.ts 中的类型,请尝试在 VSCode 中关闭 js 文件后再打开。
使用 declare 语句
回到 App.tsx ,现在我们为组件的调用应用类型检查。因为 App 组件没有 props 因此不需要在组件开头声明类型,不过还是要在文件开头添加 // @ts-check 开静态检查。
但是注意到此时 Login 组件下方和红色报错,这是因为一旦为 Login 创建 d.ts 文件,TS 静态检查器将以 Login.d.ts 文件为准获取组件信息,而不是 Login.jsx ,而 Login.d.ts 中没有包含任何 Login 组件的信息,因此导致报错,注意此时项目仍然可以正常编译运行,因为正如前文所述,在使用 JavaScript 的 React 项目中 Webpack 编译器只关注 .js/.jsx 文件,爆红仅仅是静态检查器的行为。
为了修正错误,我们需要在 Login.d.ts 声明 Login 组件,告诉 TS 静态检查器 Login 是什么:现在将 App.d.ts 和 Login.d.ts 文件改为:
1 | // App.d.ts |
在 App 和 Login 前添加 declare 关键字是因为 d.ts 中应该只包含 Login 或 App 的类型而没有具体实现,因此需要使用 declare 关键字告诉 TS 静态检查器这里有一个名为 Login 的 React 组件,其 Props 的类型为 LoginProps ,真正的实现在项目的某处,由编译器自己去找。React.FC<LoginProps> 实际上是 React.FunctionComponent<LoginProps> 的别名,等价于:
1 | declare const Login: (props: LoginProps) => React.ReactElement<LoginProps> |
在不涉及泛型的情况下,使用 React.FC<> 即可。
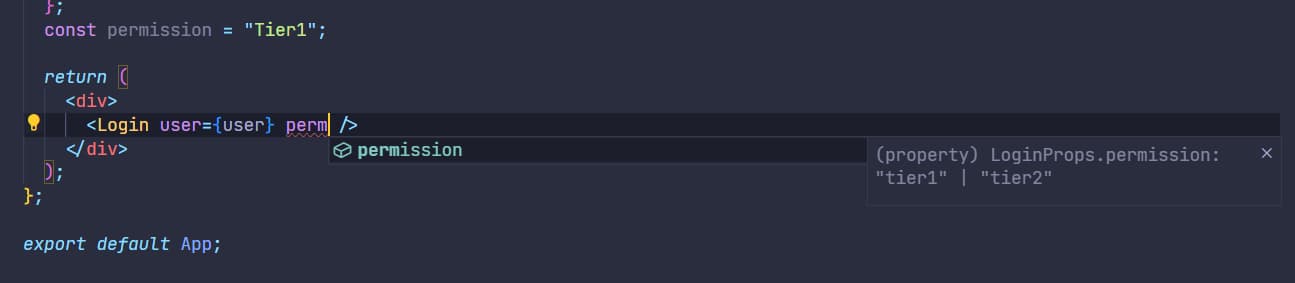
为 Login 组件添加类型声明后,我们将发现,TS 静态检查器在 App 中了解到 Login 组件的 Props 信息,知道所有 Props 应该类型,同时发现先前的代码中对 Login 组件的 permision 属性传入是一个拼写错误。因为 TS 了解类型信息,所以可以给出可靠的代码提示,根据代码提示修改错误即可:
最后给出最终修改好的所有代码:
App.jsx
1 | // @ts-check |
App.d.ts
1 | import * as React from "react"; |
Login.jsx
1 | // @ts-check |
Login.d.ts
1 | import * as React from "react"; |
实现 Redux 的类型安全
到目前为止,我们已经能够避免 React-JavaScript 项目中大部分由类型错误产生的 bug 。但是在引入 Redux 的项目中,Redux 部分的静态检查问题仍然没有解决。
Redux 是一种前端状态管理库,在 React 应用中可以实现跨组件通信。这一部分将假设你了解 Redux 的使用方法,知道 Reducer、Action、Selector、Dispatch 等概念,并且使用的是原生 Redux 写法,而不是现在官方推荐的 Redux Toolkit 框架。
此处给出一个在 React 项目中使用 Redux 的传统姿势:
1 | // index.jsx |
这里的代码示例中 App 与 Login 已经完成了静态检查,唯一不同的是 App 中的 user 从 Redux 中获取,Login 中的 handleLogin 可以修改 testLoginState 中的内容,实际的项目中这里可能表示某个按钮的点击事件,然后进行登录。接着 user 被更新,然后完成 UI 的更新。
可以看到 TS 静态检查器在 App 的 useSelector 中给出了警告,因为此时 state 的类型是 DefaultState 。
一般来说,如果 bug 被定位到这段代码中,那么将非常难以调试。试想这样的场景:
-
你发现
user可能是导致 bug 的原因,然后想看看user里究竟有什么; -
你鼠标悬停在
user想看看它是什么类型,TS 当然不知道它是什么类型,毕竟此时state的类型是DefaultState,代码编辑器将user的类型显示为为any; -
你发现这是一个来自 Redux 中
TestLogin部分的State; -
接着你翻山越岭,找到了初始化
state.testLogin.user的地方——TestLoginReducer.js的initialState变量内,然后从代码的海洋中(要知道一个reducer中定义的State一般来说很可能有几十甚至上百个property)找到了user的初始化情况,然而却惊讶地发现它被初始化为null。 -
这将导致你无法仅通过代码了解到
user的具体情况,你不得不使用console.log在运行时打印user的值来确认其类型,如果仍为null,那么意味着 bug 可能存在于与此状态相关的某个dispatch异步事件中,此时你可能尝试搜索引用了能够修改user值的那些action的所有dispatch,或者开始联系曾经接手过这部分代码的所有同事帮助你共同排查 bug …
总之这将会是一个艰难的过程。
你可能会想到利用之前提到的的 JSDoc 在调用 useSelector 时编写注释,让后来的人能够通过类型注解知道此处 user 的类型,但是这不是一个根本上的解决方案,因为这意味着每次使用 useSelector 都需要单独编写类型注释,比较麻烦,而且未必可靠。
我们希望的是,让 useSelector 了解 state 的结构,从而使得传入的 (state)=>({}) 函数可以自动推导类型,直接得出 user 的类型是 {username: string; password: string} | undefined 的结论。同时我们还希望规范所有 action 的类型,让所有 type 的 action 都只能对应特定类型的 payload ,并且减少直接使用 dispatch 的机会,转而使用一类被称为 ActionCreator 的函数,通过仅通过调用带类型参数的返回 action 的函数来帮助创建 action 并且 disptach 。
定义 Action
上述 Redux 示例里有两个 action ,均在 TestLoginAction.js 下,和之前做类型检查的步骤一样,添加对应的 TestLoginAction.d.ts 如下:
1 | export declare const TEST_LOGIN_LOGIN: "testLogin/login"; |
我们想要为每一种 action 都指定对应的 payload ,这可以使用 interface 实现,这里有两种 action —— TEST_LOGIN_LOGIN 和 TEST_LOGIN_LOGOUT ,其中 TEST_LOGIN_LOGIN 这个 action 需要特定类型的 payload ,而另一个不需要,TestLogin 的所有 Action 类型被汇总为 TestLoginAction 这种类型,它是所有 Action 的联合类型。
声明 State 的类型
TestLogin 的 state 也需要确定类型,从上可知 user 和 loginTime 都可以是 null ,实际上让它默认是 undefined 也问题不大,除非需要和后端传来的数据做匹配,不过更好的做法是初始化 username 和 password 为 ""。可以先在 TestLoginReducer.d.ts 加上:
1 | export interface TestLoginState { |
然后在 TestLoginReducer.js 中声明:
1 | /** |
类型安全的 Reducer
Redux 中的 Reducer 是一种泛型,其原型为 Reducer<S, A> = (prevState: S, action: A) => S ,源于 演算,意思是给定初始的 state ,输入一个 action 序列,最终得到另外一个 state 。JavaScript 中的 reduce 函数式接口概念与此类似。
对于 testLoginReducer 这个函数,可以直接将其声明为:
1 | /** |
然后在 testLoginReducer 中启用 // @ts-check ,上述 reducer 中的 switch 语句是故意留空的,这时候代码会爆红,别急,稍后我们会来处理。接着还需要在 TestLoginReducer.d.ts 中声明 testLoginReducer 的存在,即添加代码:
1 | import { Reducer } from "react"; |
此时 testLoginReducer 就是类型安全的了。
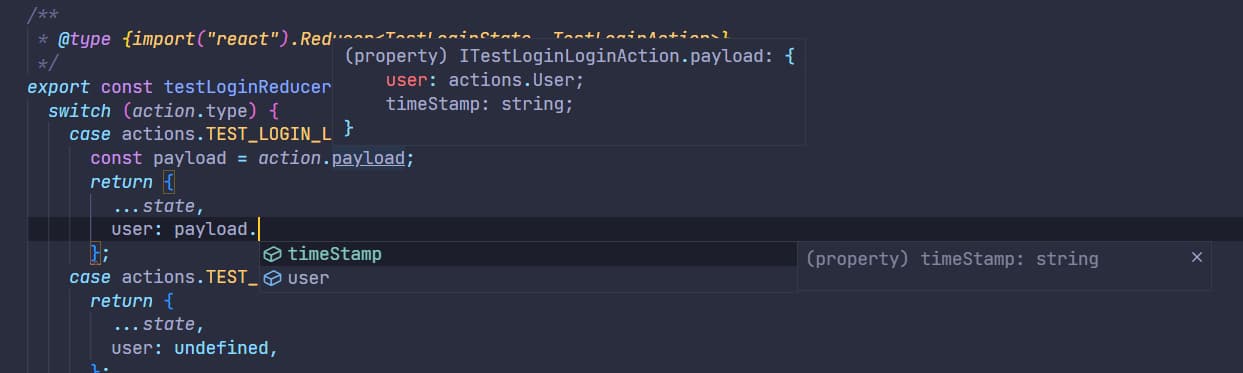
现在我们可以试着写一下 testLoginReducer 具体内容,将代码修改为:
1 | // @ts-check |
此时爆红消失了。我们建议你手动编写这段代码而不是直接复制,然后你会发现,TS 静态检查器会在每个分支智能地判断出 action 的类型,从而让 VSCode 给出可靠的代码提示。
带类型封装的 useSelector 与 useDispatch
最后,我们需要在使用 dipsatch 和 selector 时也能享受到类型静态类型检查的好处,提升代码质量。为实现这一点,我们需要封装自己的 useSelector 和 useDispatch 。
首先创建 store.d.js ,添加如下代码:
1 | import { EmptyObject, Store } from "redux"; |
我们先定义好整个 state 的类型,因为在 combineReducers 里我们写道:testLogin: testLoginReducer ,那么 TestLoginState 在所谓 RootState 的属性名就是 testLogin ,将来引入其他 Reducer 时同理。
然后定义 RootAction 的类型,这是整个项目所有 Action 的联合类型(此处只有一类 Action 即 TestLoginAction)。接着定义自己的 dispatch 类型,即 AppDispatch: Dispatch<RootAction> ,这里的意思是凡是使用这种类型的 dispatch 时,传入的 Action 都必须是 RootAction 中的某一个实例,即在 RootAction 中注册的任意一种 Action 。
接着,注意到我们在 store.js中 export 了 store 这种变量,因此需要在 store.d.ts 中声明这个变量。由于 createStore 方法是一个过时的 API ,store 的类型变得无关紧要,所以简单声明为 Store<EmptyObject> 即可。
最后,创建 hooks.js 和 hooks.d.ts ,内容分别为:
hooks.js
1 | import { useDispatch, useSelector } from "react-redux"; |
hooks.d.ts
1 | import { TypedUseSelectorHook } from "react-redux"; |
现在,我们可以在组件中使用类型安全的 useAppSelector 和 useAppDispatch 来与 Redux 交互了。
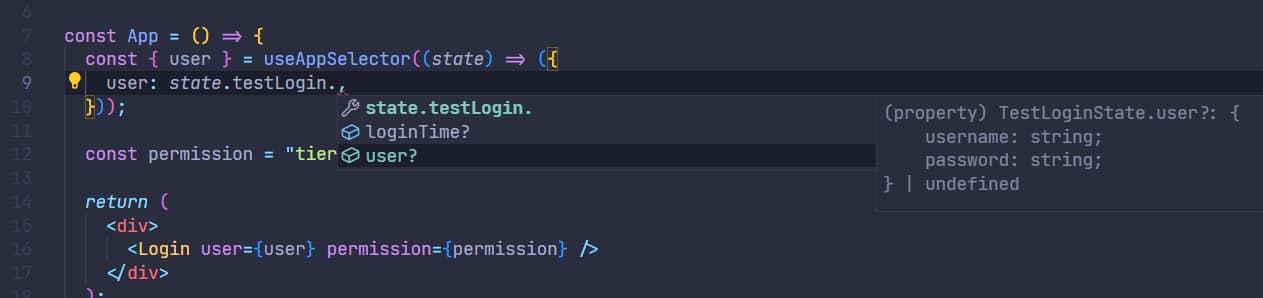
回到 App.jsx ,将代码修改为:
1 | // @ts-check |
你将会惊奇地发现使用 useAppSelector 时 state 是包含类型信息的:
同样地在 Login.jsx 中使用全新的 useAppDispatch :
1 | // @ts-check |
在这里使用 dispatch 时也可以给出可靠的代码提示。

实现 ActionCreator
比起本文所述的 Redux 的使用方法,Redux 官方目前更加推荐另一种写法,即前文数次提到的 Redux Toolkit。Redux Toolkit 是一种对 Redux 更高层次的封装,要使用它实现上述 TestLoginState 需求,代码可以是:
1 | // TestLoginSlice.ts |
我们注意到,传统的 Redux 写法需要手动编写 Reducer<S, A> 函数,形成大量模板代码,有时候这是难以维护的。Redux Toolkit 的开发者注意到 action.type 大部分时候是可以对开发者隐藏的,因此使用 Slice 来将 Reducer 和 Action 统一起来。
上述代码中 export 的 login 和 logout 并不是带有 type 属性的 action 实例,而是生成 action 的函数,称为 ActionCreator 。以 login 为例,注意到 reducers 中写着 login 的函数签名为 :
1 | (state, action: PayloadAction<{user: User; timeStamp: string;}>) => void |
action 的类型实际上是:
1 | { |
而下方 export 的 login 是一个类型为:
1 | (payload: { user: User; timeStamp: string; }) => { |
的 ActionCreator ,返回的正是一个 action ,一般来说,实际执行的时候 type 的值将满足 Redux Toolkit 的命名规范: testLogin/login ,dispatch 再根据这个 type 选择 reducers 中的某个方法执行。
虽然 Redux Toolkit 有诸多好处,既可以化简代码,又保证了类型安全,但是很可惜,从原生 Redux 写法迁移到 Redux Toolkit 的难度不会比一次性从 JavaScript 迁移到 TypeScript 低多少,因为直接迁移意味着所有显示构造 action 并执行 dispatch 的语句都需要进行修改,还需要改写所有 Reducer<S, A> 。就目前我正在尝试引入静态检查的项目而言,这类 dispatch 的调用超过 处,未来还将持续增加。因此直接迁移到 Redux Toolkit 几乎不可行。
不过我们还是可以通过手动创建 ActionCreator 来简化 dispatch 的调用。以前文提到的 login 和 logout 为例。我们只需要在 TestLoginAction.js 中添加两个函数 loginAction 和 logoutAction:
1 | // @ts-check |
然后在 TestLoginAction.d.ts 中将其声明为:
1 | export type LoginAction = (user: User) => ITestLoginLoginAction; |
我们就完成了 ActionCreator 的手动创建。
之后就可以使用形如 dispatch(loginAction(...)) 的写法修改 Redux State 的状态了。
总结
一名开发者今天写的代码不仅为了完成当下的任务,还是现在与未来交流的桥梁。我们所做的一切都是为了提升代码的可读性,在未来的自己或他人回来再看这段代码、重构或修复 bug 时能迅速领会其含义、发现其中的错误,从而减少未来维护的成本、提升编码体验。这也是静态类型检查的目的。
遵照上述方法,我们可以渐进式地在使用 JavaScript 编写的 React-Redux 应用类型检查,直至整个项目几乎完全实现类型安全。
参考文献
- TypeScript 渐进迁移指南:https://segmentfault.com/a/1190000038963440
- 利用 TS-Check 对 JavaScript 进行静态类型检测:https://daotin.netlify.app/fw8lsf.html
- TypeScript + React + Redux = ❤️: https://zhuanlan.zhihu.com/p/74749048
附录
一些常用的 Typescript 类型声明示例
因为这不是一本字典,所以这里采用 Q&A 的形式给出一些示例:
如何封装一个 Material-UI 组件?
以封装一个 Box 为例,假设你想要封装一个最外层为 Box 的组件,你想要这个组件的 Props 暴露给外部时让人感觉它是一个包含额外功能的 Box ,只需要让这个组件的 Props 的类型继承 BoxProps (MUI 中的所有组件都有其 Props 的 type 可以直接 import) ,以刚才的 Login 组件为例,假设其最外层为 Box ,希望拥有 Box 的所有属性,可以写为:
Login.d.ts
1 | import * as React from "react"; |
Login.jsx
1 | // @ts-check |
组件的 props 没有 children 属性怎么办?
在组件的 Props 接口中添加一个字段:children: React.ReactNode 即可。以 Login 为例:
1 | import * as React from "react"; |
如何继承泛型组件的 Props?
以 MUI 中的 Autocomplete 为例,AutocompleteProps 是一个泛型 type,原型为:
1 | interface AutocompleteProps<T, Multiple extends boolean | undefined, DisableClearable extends boolean | undefined, FreeSolo extends boolean | undefined, ChipComponent extends React.ElementType<any> = "div"> |
需要泛型参数 T ,如果要声明一个自定义组件 CustomAutocomplete ,可以写为:
1 | export type CustomAutocompleteProps<T> = |
怎样选择性继承属性?
TypeScript 的 Omit 语法允许你剔除类型中的某些字段,假设要剔除下面类型中的 b 和 d 字段:
1 | interface TypeA { |
可以写为:
1 | type TypeB = Omit<TypeA, "b" | "d">; |
TypeB 等价于:
1 | interface TypeB { |
如何合并两个类型?
个人认为用 type 更加方便,当然 interface 也可以。
1 | interface TypeA { |
如果使用 type 合并上面两个类型,可以写为:
1 | type TypeC = TypeA & TypeB; |
等价于:
1 | interface TypeC { |
这被称为 Intersections Type .
其他常见问题
使用 d.ts 进行类型声明后如何快速定位到组件的实现?
这的确是一个尚且无法完美解决的问题。以往当我们引用一个组件时,只需要将鼠标悬浮到组件名上,按下 Ctrl ,然后单击鼠标左键,就编辑器就会直接转跳到组件的实现,而当引入 d.ts 时,上述操作只能转跳到组件的声明。对于组件的使用者,这尚且可以接受,但是对于组件的开发者来说就不方便了。
好消息是,如果你使用的是 WebStorm ,在 d.ts 中选中组件的声明,然后按下 Ctrl+F12 ,就可以直接转跳到组件的实现。
然而如果你使用的是 VSCode,很不幸,虽然 Stack Overflow 上相关问题与官方文档都声称: “如果将 VSCode 升级到 1.67 版本、TypeScript 升级到 4.7 版本,然后在 d.ts 中选中组件名,接着右键点击 Go to Source Definition,就可以转跳到组件的实现。” ,但经过本人多次实验与尝试,这种做法并没有奏效;不过经测试,以下做法勉强可行:在 d.ts 中选中组件的 Props 的定义,然后右键选择 Go to Implementations (或按下 Ctrl+F12),编辑器就会转跳至 .js 文件中声明组件 Props 类型的位置,同时也是组件实现的开头位置。举例来说,你想定位到 Login 组件的实现,那么可以在 d.ts 中选中 LoginProps ,一般来说 LoginProps 就在 Login 声明的向上若干行的位置,接着右键点击 Go to Implementations 就转跳到 Login 组件上方写着 @param {import("./Login").LoginProps} props 的位置。这种做法可行的原因是点击 Go to Implementations 后 VSCode 似乎会尝试寻找 .js 中所有引用了这个对象的位置。如果只有一个引用,VSCode 将直接转跳,否则 VSCode 会显示一个列表,允许你选择想要转跳到哪一个引用。而组件的 Props 接口通常与组件名关联,整个项目中通常只有一个或几个。
如何让 TS 静态检查器识别 @ 路径别名
为了方便,许多项目会在 Webpack 中将 @ 配置为 src/* 路径的别名,这样可以使用形如 @/components/xxx 的路径来引用组件。这样的做法虽然编译没问题,却对静态检查不友好,因为静态检查器并不知道 Webpack 的设置。可以通过配置 jsconfig.json 来解决此问题,具体做法是,在项目根目录下创建 jsconfig.json (新版 creat-react-app 好像会自动创建这个文件,如果是 TypeScript 版的 React 项目那就是 tsconfig.json ),然后在里面添加如下内容:
1 | { |
"@/*": ["src/*"] 是实现上述需求的关键,意思是任何 "@/xxx" 的路径都会被静态检查器视作以项目根目录为基准的 src/xxx 路径。其他配置则是为了解决其他问题,比如下一个问题。
保存文件后,VSCode 将显示 “初始化 JS/TS 语言功能” ,这表明它正在根据 jsconfig.json 配置项目环境。配置完成后我们将发现所有合法的形如 @/xxx 的路径都可以通过 Ctrl+左键 直接转跳,TS 静态检查器也可以正确识别这些路径的内容。
使用 Set 和 Map 时 TS 静态检查器爆红怎么办?
Set 和 Map 是 ES2015 的新特性,其他特性还包括 Promise 、字符串模板、对象字面量、let/const 关键字等,部分特性要求在 jsconfig.json 中显式声明所用的 ES 版本才能让 ts-check 正确识别,因此在 jsconfig.json 的 "compilerOptions" 里加上 "target": "ES2015", 即可。