
在游戏开发中,使用鼠标指针与场景进行互动是很常见的需求。我们可能需要使用鼠标来选中场景中的物体,为主角选择一个移动目标点,或是一款建造游戏中玩家选择关卡中的某个点来放置建筑等;进一步地我们可能需要让鼠标悬浮在不同物体上时显示不同外观的光标,如鼠标悬浮在敌人上方时将光标显示为一把剑、悬浮在 UI 按钮上时改变光标颜色、悬浮在主角不可到达的位置时显示为一个红叉等。
本文将介绍一种实现可灵活配置光标的技巧,其能便于我们在制作 Unity 游戏时方便地配置不同场景下光标的外观,同时介绍检查鼠标是否悬浮 UI 控件上的方法。后者旨在系统性解决以往我和我的朋友们使用 Unity 开发游戏过程中,我们常常遇到的射线检测穿透 UI 导致 UI 点击事件和光标与场景交互事件相互干扰的问题。
最终效果
- Unity 版本:2021.3.29f1
- 源码:
- 地址:https://wwit.lanzout.com/iQxWh16lfkcb
- 密码:
5zm9
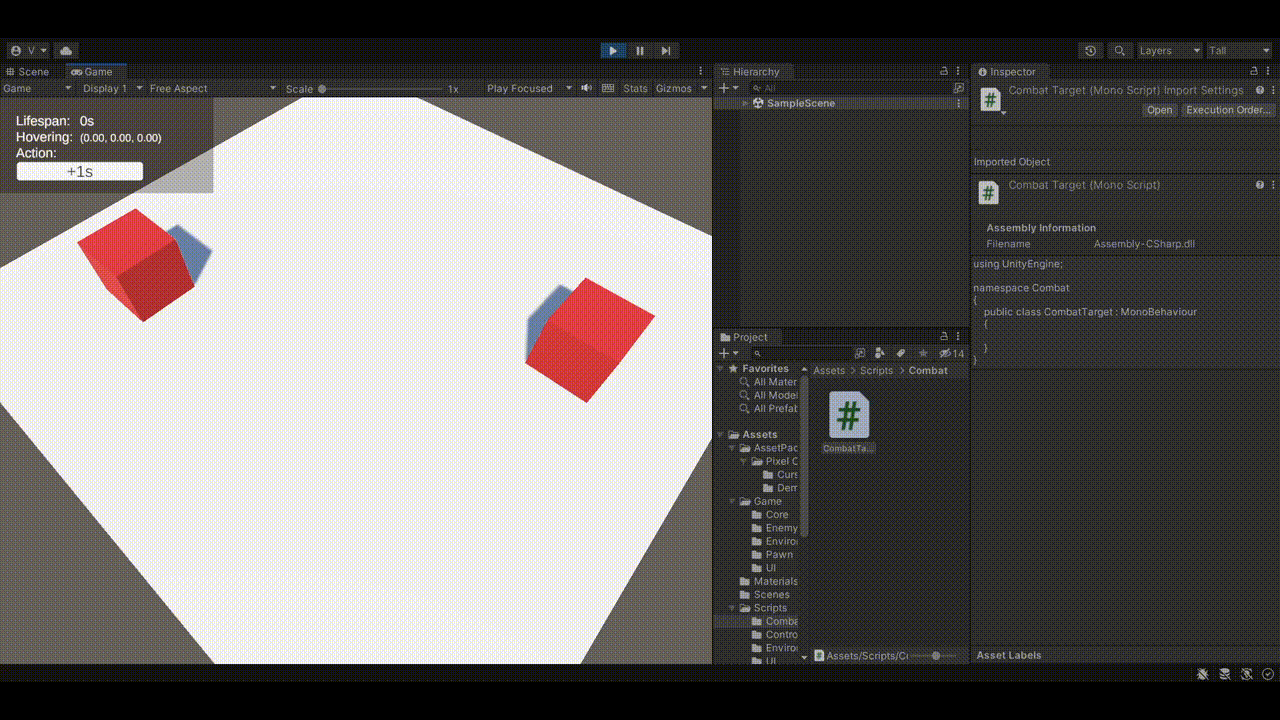
如上图所示,可以想象这是一个 RPG 或者 RTS 游戏的场景,玩家需要用点击 UI 或场景中的物体来指示主角或单位进行移动与战斗。在本例中,白色的平面表示地面,主角可以在上面进行移动;红色的方块表示敌人,点击它表示指示主角攻击敌人;鼠标移动到白色平面之外的虚空并点击则让主角返回 Idle 状态。
从上图可以看到,我们要实现的最终效果是,当鼠标悬浮在地面上时为普通白色指针;悬浮在敌人上时显示一把剑;悬浮在虚空上时显示一个红叉;悬浮在 UI 上时显示为蓝色指针。鼠标悬浮在非虚空物体上时 UI 将显示对应位置的坐标;点击任何非虚空物体时将显示点击事件对应的行为;如果鼠标悬浮在 UI 上,那么任何点击场景中物体的事件都不会被触发。
基于光标位置的场景射线检测
首先我们定义好场景中的每一类物体,以便稍后进行射线检测时我们能区分一个 GameObject 是地面还是敌人,或是其他物体。
为地面添加 Landmass 脚本:
using UnityEngine;

namespace Environment
{
    public class Landmass : MonoBehaviour
    {

    }
}
为敌人添加 CombatTarget 脚本:
using UnityEngine;

namespace Combat
{
    public class CombatTarget : MonoBehaviour
    {

    }
}
最后,我们需要一个 PlayerController,它将在每帧对场景进行一次射线检测。由于这个项目仅仅是为了演示鼠标的相关内容,因此场景中的 Player 游戏对象除了挂上了 PlayerController 脚本,几乎只是一个空的 GameObject 而已。
// ...
using UnityEngine;

namespace Control
{
    public class PlayerController : MonoBehaviour
    {
        // ...
    }
}
我们将使用 Physics.Raycast 函数进行场景的射线检测,其声明如下:
bool Raycast(Ray ray, out RaycastHit hitInfo);可见我们需要从屏幕空间鼠标悬浮的位置获得一个 Ray 实例来做射线检测。可以使用 Camera 的 ScreenPointToRay 方法实现这一点,它需要传入一个 Vector3,即当前鼠标在屏幕空间中的坐标,这可以通过 Input.mousePosition 获取。
以上逻辑可以抽象到一个 GetMouseRay 中:
private Ray GetMouseRay()
{
    return mainCamera.ScreenPointToRay(Input.mousePosition);
}
而在此之前,我们需要先获取当前的摄像机对象:
private Camera mainCamera;

private void Start()
{
    mainCamera = Camera.main;
}
最后,我们将创建一个 InteractWithComponent 方法,在 Update 函数中调用,方法内先从鼠标的位置对下方的场景做射线检测,再根据检测到的物体是否拥有 Landmass 或 CombatTarget 组件来确定当前鼠标指针悬浮在什么物体上。
这部分最终的的 PlayerController 如下:
using System;
using System.Collections;
using System.Collections.Generic;
using Combat;
using Environment;
using UnityEngine;

namespace Control
{
    public class PlayerController : MonoBehaviour
    {
        private Camera mainCamera;

        private void Start()
        {
            mainCamera = Camera.main;
        }

        private void Update()
        {
            InteractWithComponent();
        }

        private bool InteractWithComponent()
        {
            bool hasHit = Physics.Raycast(GetMouseRay(), out var raycastHit);

            if (hasHit)
            {
                var landmass = raycastHit.transform.GetComponent<Landmass>();
                var combatTarget = raycastHit.transform.GetComponent<CombatTarget>();

                if (landmass != null)
                {
                    Debug.Log($"hovering landmass");
                }
                else if (combatTarget != null)
                {
                    Debug.Log($"hovering combatTarget");
                }
                else
                {
                    Debug.Log($"hovering nothing");
                }
            }
            else
            {
                Debug.Log($"hovering nothing");
            }

            return true;
        }

        private Ray GetMouseRay()
        {
            return mainCamera.ScreenPointToRay(Input.mousePosition);
        }
    }
}
可配置的鼠标指针样式
接下来我们来实现鼠标悬浮在不同物体上时,显示为不同的图标。
要想更改鼠标指针显示的图案,可以使用 Cursor.SetCursor 方法,其函数签名为:
public static void SetCursor(Texture2D texture, Vector2 hotspot, CursorMode cursorMode)可见调用该函数我们首先需要传入一份 Texture2D 纹理数据,再设置一个偏移量。

这里我们使用 Pixel Cursors 这个素材包来进行演示,该素材包在 Unity 素材商店中是免费的。将素材包导入项目后,注意将素材的 Texture Type 修改为 Cursor,Advanced 选项中的 Read/Write 也需要勾上。
我们需要一个 struct 来指明鼠标指向的每一种物体和图标的对应关系。在 PlayerController 中创建一个内部类:
[System.Serializable]
struct CursorMapping
{
    public CursorType cursorType;
    public Texture2D texture;
    public Vector2 hotspot;
}
其中 CursorType 是一个枚举类型,其定义为:
namespace Control
{
    public enum CursorType
    {
        None,
        Movement,
        Combat,
        UI,
    }
}
足以用于表示目前我们需要的每一种光标类型。
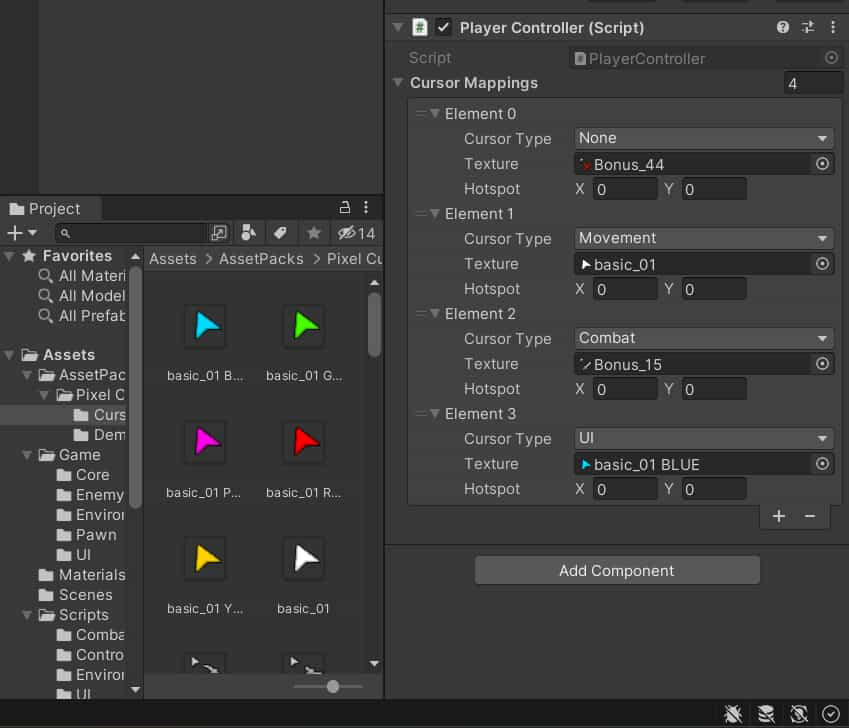
CursorMapping 建立起了每一种 CursorType 到对应鼠标指针样式的映射。一个 CursorMapping 实例可以解读为 cursorType 这种类型的光标对应的哪一个图片(Texture 2D)资产、hotspot 的值是多少。
在 PlayerController 中添加一个字段:
[SerializeField] private CursorMapping[] cursorMappings = null;这可以方便地让我们在编辑器中配置每一种 CursorType 对应哪一张纹理,形成一张映射表:
映射表建立好后,下面的工作就是实现一组函数,能让我们方便地通过传入一个 CursorType 来更新鼠标指针样式:
private void SetCursor(CursorType cursorType)
{
    CursorMapping? mapping = GetCursorMapping(cursorType);
    if (mapping != null)
    {
        Cursor.SetCursor(mapping?.texture, mapping?.hotspot ?? Vector2.zero, CursorMode.Auto);
    }
}

private CursorMapping? GetCursorMapping(CursorType cursorType)
{
    if (cursorMappings == null) return null;
    foreach (var cursorMapping in cursorMappings)
    {
        if (cursorMapping.cursorType == cursorType)
        {
            return cursorMapping;
        }
    }

    return null;
}
SetCursor 通过接受一个 CursorType、查找对应的鼠标指针纹理,最后调用 Cursor.SetCursor 来传入对应的纹理和偏移坐标,从而实现更新鼠标指针样式。
GetCursorMapping 则用来通过 CursorType 从 cursorMappings 中遍历找出所需要的 cursorMapping 对象,返回对应的 texture 和 hotspot 配置,以供 SetCursor 中调用。
值得注意的是,如果用户没有为某一种 CursorType 做配置,却在调用 SetCursor 时传入了这种 CursorType,GetCursorMapping 将会返回 null,这就是它的返回类型是 CursorMapping? 而不是 CursorMapping 的原因。
然而在 SetCursor 中,即使我们已经中 if 语句中判断了 mapping != null、保证它在 if 块内不是 null,C# 的编译器依然强制要求我们在稍后引用 CursorMapping 中的字段时,使用 ?. 语法,可见 C# 静态检查器在自动类型推导方面仍有不少提升空间。
最后,在 InteractWithComponent 中,我们将先前的简单执行 Debug.Log 改为使用 SetCursor,从而实现根据鼠标下方的物体类型变更鼠标指针的图标样式。
PlayerController 在这部分最终做了如下修改:
// ...
using UnityEngine;

namespace Control
{
    public class PlayerController : MonoBehaviour
    {
        // ...

        [System.Serializable]
        struct CursorMapping
        {
            public CursorType cursorType;
            public Texture2D texture;
            public Vector2 hotspot;
        }

        [SerializeField] private CursorMapping[] cursorMappings = null;

        // ...

        private void Update()
        {
            InteractWithComponent();
        }

        private bool InteractWithComponent()
        {
            bool hasHit = Physics.Raycast(GetMouseRay(), out var raycastHit);

            if (hasHit)
            {
                var landmass = raycastHit.transform.GetComponent<Landmass>();
                var combatTarget = raycastHit.transform.GetComponent<CombatTarget>();

                if (landmass != null)
                {
                    SetCursor(CursorType.Movement);
                }
                else if (combatTarget != null)
                {
                    SetCursor(CursorType.Combat);
                }
                else
                {
                    SetCursor(CursorType.None);
                }
            }
            else
            {
                SetCursor(CursorType.None);
            }

            return true;
        }

        // ...

        private void SetCursor(CursorType cursorType)
        {
            CursorMapping? mapping = GetCursorMapping(cursorType);
            if (mapping != null)
            {
                Cursor.SetCursor(mapping?.texture, mapping?.hotspot ?? Vector2.zero, CursorMode.Auto);
            }
        }

        private CursorMapping? GetCursorMapping(CursorType cursorType)
        {
            if (cursorMappings == null) return null;
            foreach (var cursorMapping in cursorMappings)
            {
                if (cursorMapping.cursorType == cursorType)
                {
                    return cursorMapping;
                }
            }

            return null;
        }
    }
}
UI 遮挡的检测
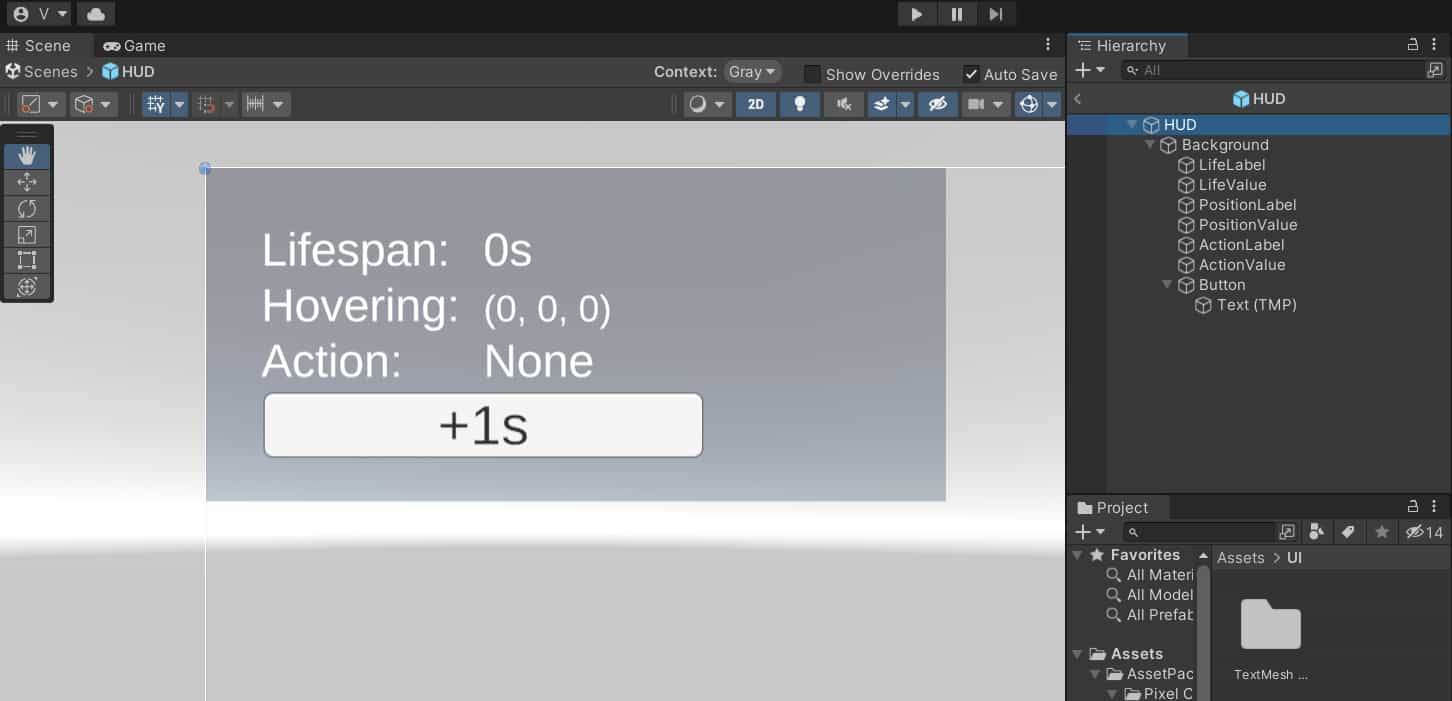
为了演示游戏在有 UI 的情况下,如何防止点击 UI 的操作同时被解读为玩家与场景中的物体交互,从而造成相互干扰的现象,我们需要先简单设计一个 UI:
为了防止 UI 点击事件影响到用户与场景的交互,很明显,我们需要在 PlayerController 的 Update 函数里调用 InteractWithComponent 先行检测当前鼠标是否悬浮在 UI 上。
该功能的实现实际上非常简单,只需要执行如下语句、检查其返回值即可:
EventSystem.current.IsPointerOverGameObject();IsPointerOverGameObject 函数的命名存在一定误导性,其中的 GameObject 指的是是某一个 UI 对象而不是场景中某一个其他类型的 GameObject。
若 IsPointerOverGameObject 返回 true 则表明鼠标当前悬浮在一个 UI 对象上,反之表明当前鼠标下方没有任何 UI。如果希望某一个 UI 元素不被 IsPointerOverGameObject 检测到,可以通过为其添加 Canvas Group 组件、取消勾选 Interactable 和 Blocks Raycasts 选项即可。
最终我们需要将 PlayerController 修改为:
// ...
using UnityEngine;
using UnityEngine.EventSystems;

namespace Control
{
    public class PlayerController : MonoBehaviour
    {
        // ...

        private void Update()
        {
            if (InteractWithUI())
            {
                return;
            }

            if (InteractWithComponent())
            {
                return;
            }
        }

        // ...

        private bool InteractWithUI()
        {
            if (EventSystem.current.IsPointerOverGameObject())
            {
                SetCursor(CursorType.UI);
                return true;
            }

            return false;
        }

        // ...
    }
}
需要注意,在 Unity 场景中创建 UI 时,一般会一并创建一个 EventSystem 游戏对象,这对我们实现 UI 遮挡检测的功能十分重要。EventSystem.current 实际上就是场景中的这一个 EventSystem 对象,如果缺少这个对象,执行该语句会抛出空指针异常。
通用的 Raycastable 接口
到目前为止,我们其实已经实现了 最终效果 中展示的全部功能了。但是还有优化空间。
我们注意到在 InteractWithComponent 方法中,我们直接依赖了 Landmass 和 CombatTarget 类,并通过若干 if-else 语句来判断被选择的游戏对象是什么类型的。这在未来的开发中可能导致几个问题:
- 如果需要检测的物体类型增多,
if-else-if语句序列会进一步加长,降低代码可维护性。 - 形如
Landmass或CombatTarget等类型可能需要反过来与PlayerController进行交互,毕竟存在敌人需要锁定玩家等需求。这将导致对象间的循环依赖,提升项目不同模块的耦合程度。
注意到 InteractWithComponent 中,我们实际并不关心 Landmass 和 CombatTaget 具体是什么,只关心它们是否能被射线检测到,以及对应的 CursorType 是什么,因此我们可以抽象出一个 IRaycastable 接口,让 Landmass 和 CombatTarget 去实现,让它们自己去定义被鼠标悬浮或点击后,自身与 PlayerController 的交互行为,并返回对应的 CursorType。
IRaycastable 定义如下:
namespace Control
{
    public interface IRaycastable
    {
        bool HandleRaycast(PlayerController playerController);
        CursorType GetCursorType();
    }
}
HandleRaycast 用于生成物体被射线检测时的反馈;GetCursorType 用于定义物体被鼠标指针指向时应显示哪一种类型的指针。
让 Landmass 和 CombatTarget 实现该接口:
using Control;
using UnityEngine;

namespace Environment
{
    public class Landmass : MonoBehaviour, IRaycastable
    {
        public bool HandleRaycast(PlayerController playerController)
        {
            if (Input.GetMouseButton(0))
            {
                playerController.CurrentActionText = "Moving";
            }

            return true;
        }

        public CursorType GetCursorType()
        {
            return CursorType.Movement;
        }
    }
}
using Control;
using UnityEngine;
namespace Combat
{
public class CombatTarget : MonoBehaviour, IRaycastable
{
public bool HandleRaycast(PlayerController playerController)
{
if (Input.GetMouseButton(0))
{
playerController.CurrentActionText = "Fighting";
}
return true;
}
public CursorType GetCursorType()
{
return CursorType.Combat;
}
}
}并修改 PlayerController 的 InteractWithComponent 方法:
// ...
using UnityEngine;
// ...

namespace Control
{
    public class PlayerController : MonoBehaviour
    {
        // ...

        public string CurrentActionText
        {
            get { return currentActionText; }
            set { currentActionText = value; }
        }

        // ...

        private bool InteractWithComponent()
        {
            bool hasHit = Physics.Raycast(GetMouseRay(), out var raycastHit);

            if (hasHit)
            {
                var raycastables = raycastHit.transform.GetComponents<IRaycastable>();

                currentHoveringPosition = raycastHit.point;

                foreach (var raycastable in raycastables)
                {
                    if (raycastable.HandleRaycast(this))
                    {
                        SetCursor(raycastable.GetCursorType());
                        return true;
                    }
                }

                SetCursor(CursorType.None);
                if (Input.GetMouseButton(0))
                    currentActionText = "Idle";
            }
            else
            {
                SetCursor(CursorType.None);
                currentHoveringPosition = Vector3.zero;
                if (Input.GetMouseButton(0))
                    currentActionText = "Idle";
            }

            return true;
        }

        // ...
    }
}
至此,我们实现了一个可灵活配置的鼠标指针系统,同时解决了在有 UI 的情况下,如何防止玩家点击 UI 的行为导致的逻辑上的歧义的问题。
除此之外我们还实现了 PlayerController 类与 Landmass、CombatTaget 类之间的控制反转,降低了模块间的耦合程度、提升了 InteractWithComponent 方法的代码质量。